Basic Car Maintenance: How to check your oil in 6 easy steps!
Watch this short video on how to check and top up your engine oil if required
Although we recommend via https://autoadvisor.co.uk to find a garage or mobile mechanic near you, to carry out all your servicing, car repairs and maintenance requirements, we thought that we would put together a few videos covering some of the more basic maintenance items. This for those who are not so familiar around and inside of the bonnet, and are not able to organise contactless service right now or cannot go to a garage.
In this short video, we are going to show you how to check your engine oil and how to top it up if needs be. As your engine is vital part in your car and cannot function efficiently without A: the correct amount of oil and B: the correct grade of oil!
Why does the engine need the correct amount of oil in it?
Well oil acts as a coolant to disperse heat away from metal components and also to lubricate them at the same time, creating a thin barrier between the 2 metal components. So, without sufficient amount of oil in your engine, some parts may run with minimal lubrication or even no lubrication at all, this can then cause premature wear on engine components which then can lead to engine failure!
Why do you need to use the correct grade of oil?
It is very important to use the correct oil grade specified by the vehicle manufacture because oils now have additives and cleaners in them to clean your engine. So, if you put in the wrong grade, your engine can’t get the correct lubrication it needs, which then causes wear on engine components and as explained earlier, prolonged use will lead to engine failure.
Step 1:
Make sure your car is parked on a level surface and that the engine has been switched off for a minimum of 5 mins to make sure we get an accurate level indication. Also, you’ll need to get some blue roll or kitchen or something other form of tissue.
Step 2 – Opening The Bonnet:
Find the bonnet release, which is normally located in either the drivers footwell or passengers footwell on the door pillar side. Pull the leaver and the bonnet will release.
Once the bonnet has released, you have to find another bonnet release up under the bonnet, normally located centrally, just under the manufactures badge.
Once you’ve lifted the bonnet, you should see a bonnet stay you can unclip to hold the bonnet up or on some models you’ll have self-holding bonnet struts.
Step 3 – Locating The Dipstick:
You then need to locate the dipstick, which on most models is located to the left-hand side of the engine and the handle is commonly coloured (i.e. red or yellow).
Step 4 – Checking Your Oil Level:
Once located simple pull the dipstick out of the holder, get your blue roll or tissue and wipe the full length of the dipstick, to make sure it is clean, so you can get an accurate reading. Slide the dipstick back in the whole and push right to the bottom, wait a few seconds and pull back out, pay close attention to the minimum and maximum marks at the lower level of the dipstick and check to see where you can see oil residue in-between these 2 marks. If your level is below the lower mark, then you need to top your all up immediately! If your level is in between the lower and upper marks, you have sufficient amount of oil in your engine, but we recommend topping it up so its nearer the upper mark on your dipstick. If your level is above the upper mark, then you have too much oil and you will need to get a mechanic to come and remove some for you!
Step 5 – Topping Up If Needs Be:
If you need to top your engine up with some oil, you’ll need to check your vehicle owner’s manual and make sure you have the correct grade of oil to hand!
If you have got the correct oil, you simply locate the oil filling whole (which is not the same as the dipstick whole) it is usually located at the highest point of the engine and is also usually colour coded the same colour as the dipstick handle. Twist the cap to open it and pour a small amount of oil into the engine, i recommend pouring roughly 100ml in at a time, while checking the oil level inbetween each amount of oil poured in. once you have the perfect oil level on the dipstick. You twist the cap back on until it cannot be twisted anymore.
Step 6 – Your Done:
Simple close your bonnet and push shut so the bonnet lines up with the front bumper and your all done. Head back in doors, make a cuppa and put your feet up!
Need help checking your oil or servicing? Find a mechanic by entering your reg below!
Other Articles
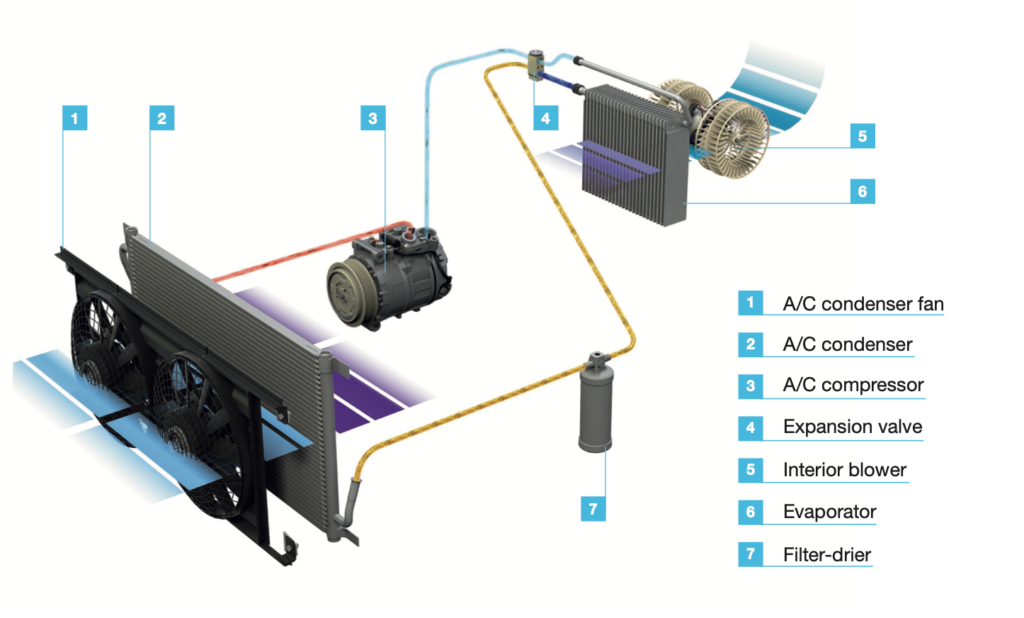
Before installing a new air conditioning compressor, always check the quantity and condition of the oil in the old compressor. Always flush the refrigerant circuit As a general rule, the refrigerant circuit must always be flushed if an air conditioning compressor has been damaged. This is the only way to prevent consequential damage caused by […]
Before installing a new air conditioning compressor, always check the quantity and condition of the oil in the old compressor. Always flush the refrigerant circuit As a general rule, the refrigerant circuit must always be flushed if an air conditioning compressor has been damaged. This is the only way to prevent consequential damage caused by […]

Buying an accident free car & avoiding a badly repaired one People take pride in their cars and want to keep them scratch, dent and of course accident free. However, as we all know accidents happen. The problem is that many cars have had accident damage. This including body panel repairs without the new owner […]
Buying an accident free car & avoiding a badly repaired one People take pride in their cars and want to keep them scratch, dent and of course accident free. However, as we all know accidents happen. The problem is that many cars have had accident damage. This including body panel repairs without the new owner […]

How to get even better performance from your Banner battery. Winter Battery Care : Keep it active Inactive batteries start to discharge in a process during which lead sulphate forms of the battery plates. This obstructs the current flow. A device like the Banner Accucharger keeps the battery in shape and prevents sulphation. This is an important part […]
How to get even better performance from your Banner battery. Winter Battery Care : Keep it active Inactive batteries start to discharge in a process during which lead sulphate forms of the battery plates. This obstructs the current flow. A device like the Banner Accucharger keeps the battery in shape and prevents sulphation. This is an important part […]